

Overview
Welcome to Part 2 of Okta Attack Techniques.
In the previous article, we took a deep dive into the basics of Okta. If learning about attack techniques in Okta interests you, that’s the best place to start, as it covers all the fundamentals and basics you need to know before diving into the attack techniques themselves.
In this blog post, we will explore the tactics employed by a red team to gain entry into an Okta environment. Additionally, we will examine how attackers use the Okta RBAC (Role-Based Access Control) module to elevate their privileges and move laterally within the Okta infrastructure. It is important to note that these attacks do not utilize code vulnerabilities; rather, they take advantage of misconfigurations implemented by IT staff. Towards the end of this blog, we will outline measures to mitigate these misconfiguration.
Note: Throughout this blog, we utilized our PowerShell-based tool that centralized all the essential Okta APIs for executing the necessary actions.
Attacking Okta Tenants
Gaining a foothold
To follow along with the upcoming examples, it is assumed that the Okta CLI has been installed. The Okta CLI provides a range of commands for managing and creating Okta resources.
Let’s start by logging into Okta:

If a user has previously logged in using the Okta CLI on this machine, the SSWS Token used can be found in the file located at C:\Users\[UserName]\.okta\okta.yaml, or a similar location.
An attacker that compromised a machine with the Okta CLI already installed and used, can steal the SSWS token that is associated with an Okta user in the same path structure and use this credential in order to perform action as the Okta user.
Recon and compromise of Okta resources
Once you have established a foothold in the environment, you can proceed to utilize the discovered SSWS token for potential attacks. The next crucial step is reconnaissance, where you gather data from the victim’s Okta environment to identify available resources and potential paths for attack. Following reconnaissance, if you have the necessary permissions, you can then proceed to initiate lateral movement or attempt privilege escalation within the environment.
In the subsequent sections, we will outline a few straightforward RBAC-based attacks that focus on exploiting misconfigurations within the Okta environment.
User (People)
The most common way to move laterally in Okta environments is to compromise users with high privileges that may be able to perform more actions in the Okta tenant. A stolen SSWS token might have:
- Any Admin Role, but at least one, aside from the “Report Admin” standard role.
Under the scope you have these privileges, and you can run the following CLI commands using the SSWS token to list all the user’s account:

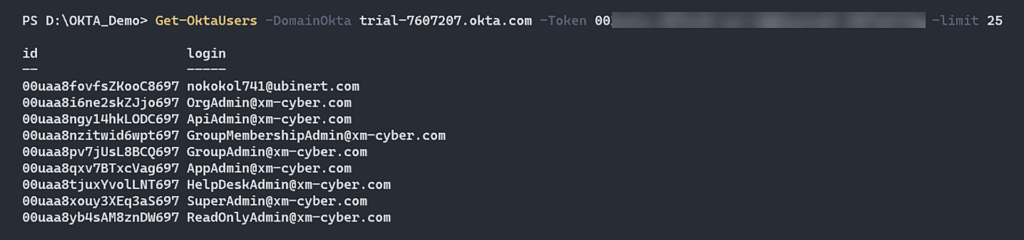
Figure 1 – Enumerate Okta Users
Groups
Groups can be crucial in your privilege escalation process. For instance, if you have the ability to manage a group or manage the membership of a group, you are able to assign users to the group and get all the benefits that associate with this group, like in the following cases:
- You can add a user to a group that assigns all its members to an integration cloud provider app, like AWS, in order to obtain a user with a specific set of permissions in the AWS environment. It can be all the other cloud providers, such as Entra ID and GCP.
- Add users to a group that has already assigned its users to an application. Utilize the capabilities of the Okta API Scope to generate an access token, enabling you to perform actions in the Okta environment that were previously inaccessible to you.
A stolen SSWS token might have:
1. All the pre-built standard roles besides the “Report Admin” standard role
Or
2. A user with a custom role that contains one of the following permissions:
- okta.groups.read – Allow only to recon Okta groups.
- okta.groups.members.manage
- okta.groups.manage
Note: If a super administrator assigns a role (which can be any standard or custom role) to a group, only users with the super administrator standard role will have the ability to manage the group and assign new users to it. This remains true even if you take over a user with the “Group Membership Administrator” or “Group Administrator” roles, or both roles combined. Under the scope in which you have these privileges, you can run the following CLI commands using the SSWS token to list all the groups in the Okta environment:


Figure 2 – Enumerate Okta Groups
Application
As we know, applications in the Okta environment are the main resource with the most powerful abilities. It means that if you take over users with the “Application Administrator” standard role, there’s a good chance that you can use this permission to perform one of the following actions:
- Assign a user to an integration cloud provider app, like AWS, in order to obtain a user with a specific set of permissions in the AWS environment. In some cases, you have the ability to choose which AWS role to assign this user.
- Assign users to applications. Utilize the capabilities of the Okta API Scope to generate an access token, enabling you to perform actions in the Okta environment that were previously inaccessible to you.
- In some cases, you can steal clear text credentials of all Okta users thanks to SCIM protocol.
A stolen SSWS token might have:
1. Users with the following standard roles:
- Super Administrator
- Application Administrator
- Read Only Administrator
- API Access Management Administrator
2. Users with custom roles that contain one of the following permissions:
- okta.apps.read – Can only get information about Okta applications.
- okta.apps.assignment.manage
- okta.apps.manage
You can run the following CLI commands using the SSWS token to list all the groups in the Okta environment:

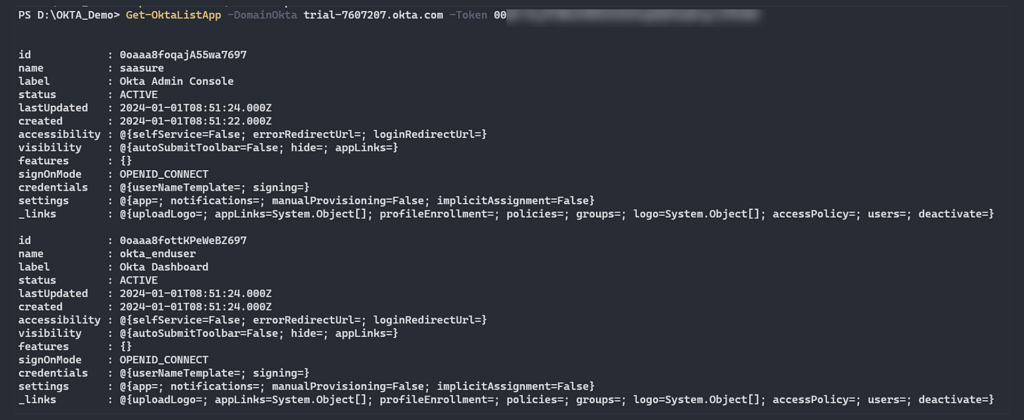
Figure 3 – Enumerate Okta Apps
Now, we are going to cover several attack scenarios, and during the demonstration we will show more reconnaissance steps for other Okta resources.
Attack Scenario 1
In the following scenario, we will illustrate how an attacker can exploit a chain of misconfigurations and Role-Based Access Control (RBAC) to gain unauthorized access to an Okta tenant and escalate their privileges within the environment.
The following diagram illustrates that attack path and action in this scenario:
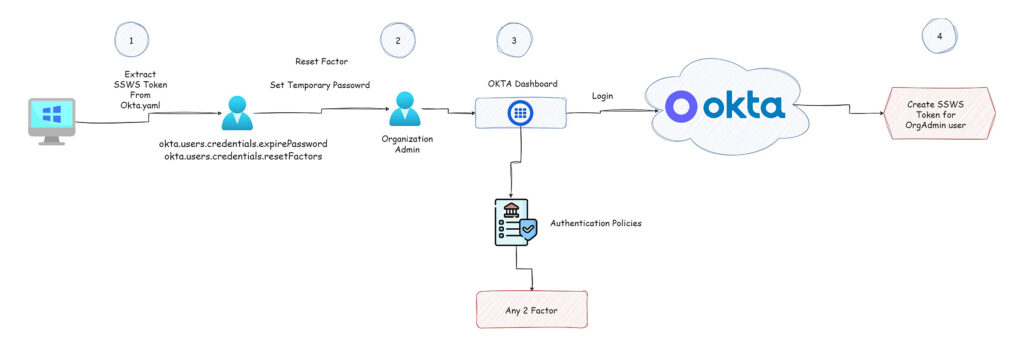
Figure 4 – Attack Scenario Path
In this scenario, we assume the breach point starts from one of the local machines inside the internal network of the organization.
The first step is initial access, and we need to find Okta credentials in order to enumerate the Okta environment. One of the ways to achieve this goal is made possible thanks to the Okta CLI. Okta CLI is a tool made by developers, for developers and the main purpose of this is to go from “zero” to running an application complete with auth (in the language and framework of your choice) within a short amount of time.
While using this tool, we pay attention to the fact that in order to use this tool, we need to enter the Okta domain and enter an SSWS Token to successfully perform the authorization part. When we opened the code, it found a path that stores all this sensitive information in a file called “okta.yaml” and the path was in the following structure
“C:\Users\{UserName}\.okta\okta.yaml”

Figure 5 – Build the path to write the configuration file.

Figure 6 – Write the configuration file to the path.
That means the path to write the configuration file with the sensitive credential will be stored in the user home directory. We used our powershell-based tool in order to find the “okta.yaml” file to steal this credential and then use the SSWS Token that’s stored inside this file against the Okta tenant. If you are on a Windows machine and you have local admin privileges, you can iterate all the home user directories in order to look for this file.
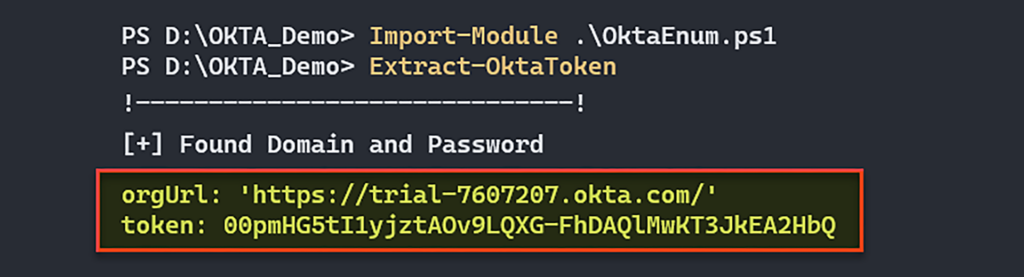
Figure 7 – Find the SSWS Token and orgUrl.
Now, with this SSWS Token we can start with basic enumeration steps that will help to figure out which actions we are able to perform. First, we want to know with which context user we are running, in order to do that we use “Get current User” Okta user API to gather this information.

Figure 8 – Get information about the user that associates with this SSWS Token.
It’s time to know which role is assigned to this user. In Okta, in order to list all the roles that associate with a user, you need a user with a Super Administrator standard role. In case you don’t have a super administrator, you won’t have the ability to see which roles are assigned to you.

Figure 9 – List all user roles with super administrator privilege.
The next step is to list all the Okta users, and we need to take these steps in order to enumerate all the users’ IDs. It’s important because the Okta API uses id to identify the resource you want to take action on, whether it’s a user, group, or application. Each resource in Okta has a unique ID.
The following picture shows a list of all the users in the Okta tenant (Okta user API).
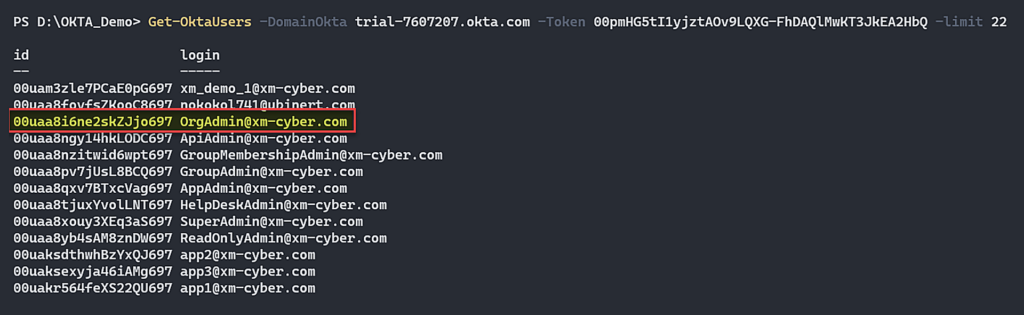
Figure 10 – List all Okta users and our target user OrgAdmin.
As we mentioned above, in this case, our users have custom roles with the following permissions:
- okta.users.credentials.expirePassword.
- okta.users.credentials.resetFactors.
The “okta.users.credentials.expirePassword” allows an admin user to set a temporary password for other users. In Okta, this permission can take action on all the users besides the users with a Super Administrator standard role. That means the user with the highest privileged role that we can set a new temporary password for is the OrgAdmin.
Now a word from Okta about the Organization Administrator standard role:
- Organization Administrators: Organization administrators (org admins) have org-wide permissions for most user management and policy settings. While org admin permissions are frequently combined with the app admin permissions to set up social authentication, we recommend combining them with a custom role for more granular access control.
Link for more information: https://help.okta.com/en-us/Content/Topics/Security/administrators-org-admin.htm
Let’s dive into the set temporary password for our target organization administrator “[email protected]” (Okta User API).

Figure 11 – Set temporary password for [email protected] user.
When you set a temporary password, that means you would need to set a new password for this user when you try to login. After we set a new password for this user, we are not able to authenticate yet, as we show in figure 4. The “Okta Dashboard application” has an authentication policy that is configured to allow authentication in a case of “Any 2 Factor”. In simple words, we need to perform 2 factor authentication in order to log in to the “Okta Dashboard application”.
In this case, we are going to use the second permission that we have in our custom role “okta.users.credentials.resetFactors”. With this permission, we have the ability to list all the factors that are associated with the user. In addition, we have the ability to reset factors, which means we can remove the factor that associates with users. In some cases, the “Device Assurance Policies” will allow it, and we can add our phone as a factor for this user (List factor API).

Figure 12 – List factor associated with [email protected].
Now, we will reset this factor using Reset Factor API.

Figure 13 – Remove factor associated with [email protected].
After we successfully remove the factor that is associated with the “[email protected]” user we can go back to the login page of Okta, and set for this user our factor in order to login to the Okta Dashboard application.

Figure 14 – New device factor configured to OrgAdmin users.
After we configure a new factor for our target user, ”[email protected]”, we can log in to the Okta tenant via the Web UI. From this point, we can basically go to the admin console application and then create SSWS Tokens in order to perform actions via the Okta API.
Remediations
- Configure the SSWS Token to be valid for a short amount of time, in order to decrease the possibility of using stolen SSWS Tokens.
- It is recommended to configure a device assurance policy that will limit which devices can act as a factor in your Okta tenant.
- It is recommended to configure a network policy that will allow network access to your Okta tenant only from the IP ranges or locations that you allow.
- It is recommended to create a monitoring system that will follow the actions that happen in your Okta tenant in order to alert on when something unusual happens in the Okta environment.
Attack Scenario 2
In the following scenario, we will assume that we have already the SSWS Token that we found in the same way we did in Attack Scenario 1, but in this case, we show how an attacker can abuse misconfiguration in your authentication policy in order to bypass the need of login first to “Okta Dashboard App” and actually bypass the authentication policy for this app that’s configured to allow login with “Any 2 Factor”.
An attacker can exploit this scenario in order to gain unauthorized access directly to one of the Okta applications (in this case AWS IAM Identity Center) and in some cases move laterally to another cloud provider environment, then try to escalate their way to control over this environment. The following diagram illustrates that attack path and action in this scenario:
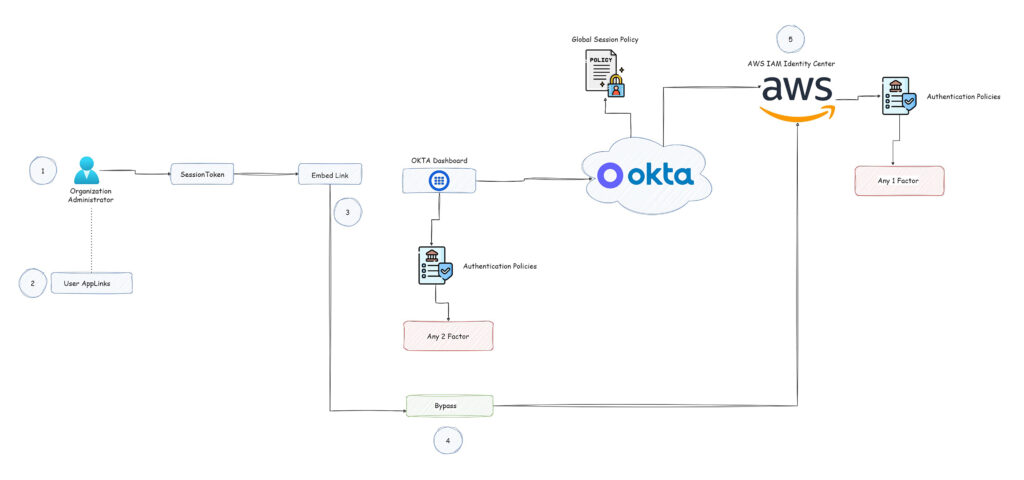
Figure 15 – Attack Scenario Path
We start this scenario with an SSWS Token that associates the user with the Organization Administrator standard role ([email protected]).
Note: Any Okta user can do this attack. We are using the Organization Administrator standard role because we want to demonstrate how to enumerate authentication policies and this is the lowest privileged user that is able to enumerate authentication policies aside from the Super Administrator standard role. Any other user standard roles are able to try to login directly to their application but depending on conditions, may or may not be successful.
In this case, we have an SSWS Token with high privileges that will allow us to enumerate Okta resources in order to identify the attack path. Let’s start to enumerate something that is called “Embedded Link” or “AppLinks”.
Let’s see how the Okta support team defines this topic:
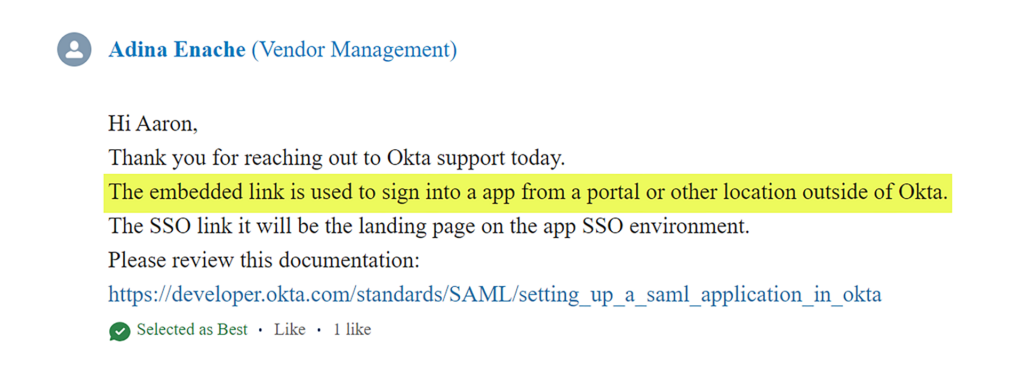

Figure 16 – List all the AppLink associated with [email protected].
In the picture above, we can see a list of all the “AppLinks” associated with our user and in this list we can see we have one application called “AWS IAM Identity Center”. Now we are going to enumerate the “Authentication Policies” that associate with the “Okta Dashboard” in order to gather information about the conditions to login to Okta tenant.
The following picture shows how we list all the authentication policies (Policy API):

Figure 17 – List all the Authentication Policies.
Now we are going to use another Okta API in order to list all the rules inside the Okta Dashboard Policy (Policy API).

Figure 18 – List all policy rules.
When we listed all the rules inside the “Okta Dashboard” policy, we found that you can login to Okta Dashboard application only with the 2FA process. That means we can’t login via the Web UI, because for this we need to have 2 Factor.
Let’s find out which authentication policy contains our application. Again, we must first list all the policies and then look at “API Create Access Policy”.

Figure 19 – List all policies and focus on “API Created Access Policy”.
We are going to check which application or any other resource is mapped to this policy (Okta API).

Figure 20 – Show which Application mapped to a Policy.
Now, after we know the “AWS IAM Identity Center” application associated with our user and also associated with the authentication policy “API Created Access Policy”, let’s find out which rules are configured in this policy.

Figure 21 – Rules that associate with “AWS IAM Identity Center” application.
In the picture above, we can see the “AWS IAM Identity Center” application has an authentication policy with a rule that allows login with only 1 Factor. That means if we find a way to authenticate directly to the application, we may be able to bypass the Okta Dashboard application. So we looked for a way to directly login to our application and then we found this:
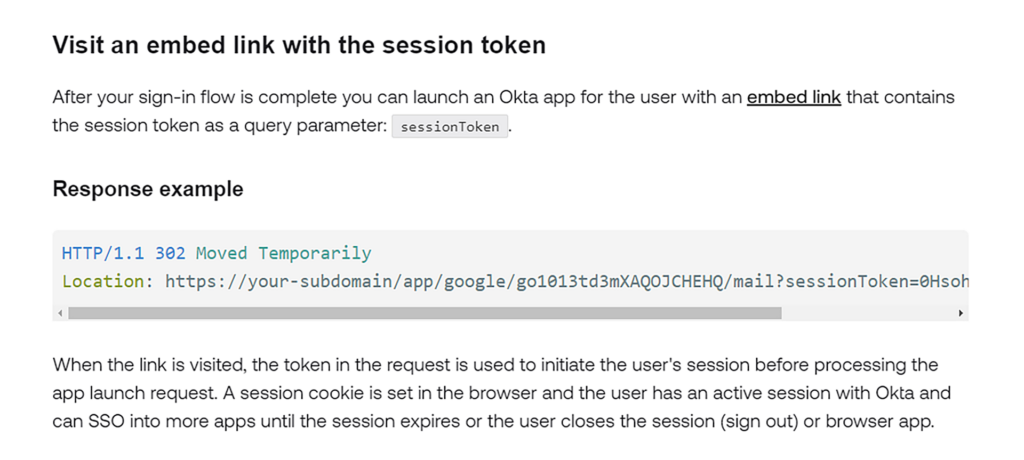
We understood that if we successfully created a session token we’d be able to authenticate the application. In order to create a session token we use the permission of the [email protected] user to reset passwords and then use this credential to create a session token. Let’s first change the password and then create a session token.

Figure 22 – Create a SessionToken for [email protected].

Figure 23 – Create embedded link with session token.
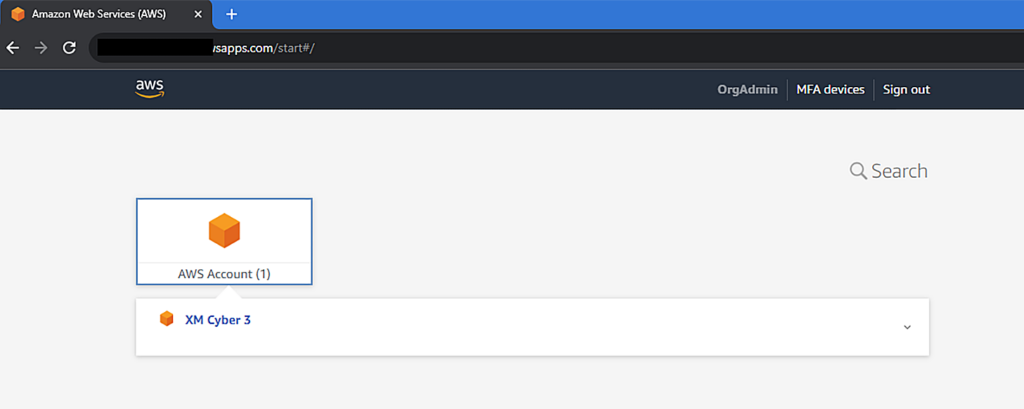
Figure 24 – Successfully login to AWS application.
Remediations
- It is recommended to configure the Global Session Policy Multifactor authentication to require MFA, in order to avoid malicious actors creating a session token and connecting to the app with an embedded link with a session token.
- It is recommended to configure all your applications “Authentication Policy” to allow login with any 2 Factor in order to avoid users logging in directly to the application.
But wait, there’s more – Check back for part 3, where we will cover even more Okta attack techniques. And if you enjoyed this article or have any other techniques to share, let us know!